If you want to improve your back flexibility, reduce muscle soreness and tension, and improve your posture and alignment, you’ve come to the right place.
Back foam rolling is a simple and effective way to achieve these benefits. It requires just a foam roller and a few minutes of your time.
I personally enjoyed foam rolling. When I learned about its benefits, I realized it is a masterpiece for feeling better and moving more freely.
It also helps me recover after an intense workout routine…
In this blog, we’ll cover the following topics:
- Benefits of back foam rolling
- Simple and effective back foam roller exercises
- How to foam roll your back
What Causes Back Muscles Pain and Soreness?
People who spend much time sitting, such as office or remote workers, often report sore back muscles.
In addition, poor posture, prolonged periods of sitting or standing, intense workout routines, sleep position, and inadequate mattress support can all contribute to the problem.
Several other factors may also cause soreness in the back muscles.
- Poor posture
- Overuse or repetitive strain injuries
- Muscle tension and knots
- Lifting heavy objects or improper lifting technique
- Sudden movements or twisting of the spine
- Inactivity or prolonged sitting
- Muscular imbalances or weaknesses
- Medical conditions.
Why Back Foam Rolling Is Needed
Most of us have tension in our upper back, neck, and shoulders due to constant hunching over a computer at work, looking at our phones, and sitting and driving.
This constant slumping can create stiffness and tightness over time, not to mention postural imbalances. Stretching is a great place to begin, but foam roller exercises for back pain are another effective option.
Foam rolling is a popular form of self-myofascial release (SMR) that involves using a foam roller to apply pressure to specific body areas.
Foam rolling helps remove adhesions in the fascia of back muscles, leading to increased flexibility, mobility, and blood flow. This can increase flexibility and mobility, reduce pain, and improve physical performance.
Caution: If you have medical conditions such as herniated discs, sciatica, or arthritis, it is important to consult a healthcare professional before performing any exercises, including foam rolling, as they may aggravate your condition.
Best Foam Roller Exercises.
A foam roller is a good way to loosen up muscles before a workout and reduce muscle soreness afterward.
It is very possible to find several trigger points throughout your body. When you hit a spot that’s especially painful or tight, pause here and try to relax.
To relieve back pain and tightness, do these exercises 3–4 times per week, even if your symptoms improve. T
ry these foam rolling exercises to improve back strength and flexibility.
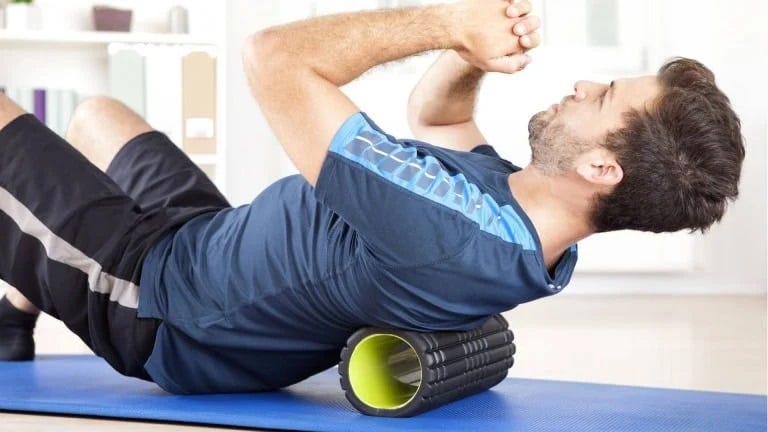
1. Thoracic Spine Foam Roll (Upper Back)
Our upper back is exposed to much stress from daily activities such as exercising, sitting, and bending over. Since we cannot avoid doing these activities, loosening this area whenever it feels tight is important.
Foam rollers are an effective way to loosen the thoracic spine and alleviate pain. They target the middle and upper back muscles, including rhomboids and traps.
I used to think foam rolling was mostly for legs and back, but then I tried it on my back — It is AWESOME.
Benefits Of Foam Rolling Thoracic Spine
- Reduces upper back pain and stiffness after intense gym workout.
- Increases mobility and flexibility in the thoracic spine
- Enhances breathing and lung capacity
- Reduces tension in the shoulders and neck

How To Do
- Lay on your back with your knees bent, placing your hands behind the back of your head or in front of you, with the foam roller just below your shoulder blades.
- Lift your hips off the floor and slowly push through your heels to move back and forth from your mid-back to the top of your shoulder blades.
- Keep your spine and head aligned in a neutral position.
- When you find a sore spot, stop and hold the position for at least 10–30 seconds until you can feel the muscle relax.
Tips
- Avoid rolling directly on your spine or lower back.
- Keep your abs engaged to support your lower back and avoid overarching.
- Breathe deeply and slowly to help relax your muscles and release tension.
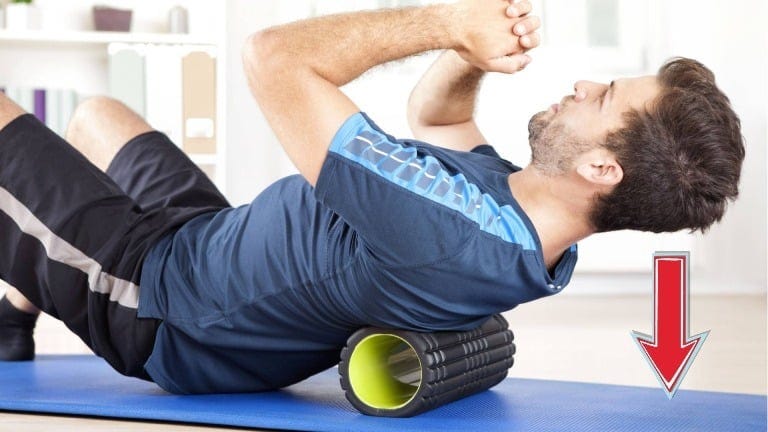
2. Foam Roller Thoracic Spine Extension
Maintaining mobility in the thoracic spine is crucial to avoid shoulder, neck, and lower back pain. If the T-spine cannot move freely, adjacent joints must overcompensate, leading to instability and soft tissue damage.
Foam roller extensions can help increase thoracic spine mobility and prevent these issues.
Benefits Of Roller Thoracic Spine Extension
- Help alleviate upper back pain,
- Reduce tightness in the thoracic spine,
- Improve posture and enhance athletic performance
How To Do
- Lay on your back with your knees bent, placing your hands behind the back of your head, with the foam roller just below your shoulder blades.
- Keep your hips on the floor and your feet hip-width apart. Slowly begin to bend backward over the roller.
- Stopping at a point where it feels comfortable.
- Return to the starting position and repeat.
Tips
- Keep your neck relaxed
- Avoid using your lower back to push yourself up.
- Breathe deeply and slowly while doing the exercise.
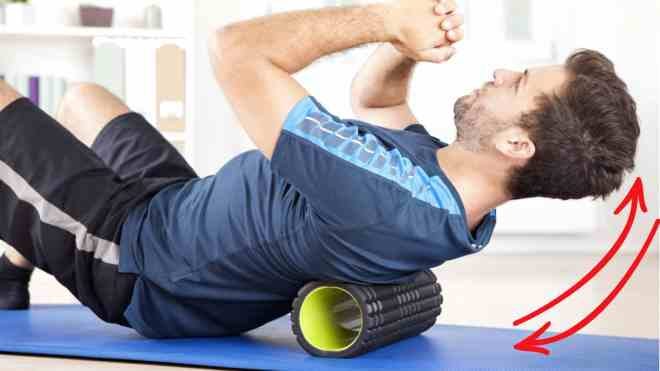
3. Upper Back (Thoracic Spine Cross Friction)
It helps to release tension and knots in the muscles around the thoracic spine, improving mobility and reducing pain.
Benefits Of Thoracic Spine Cross-Friction
- Reduced muscle tension and pain in the upper back
- Increased blood flow to the area
- Relief from headaches and neck pain
How To Do
- Lay on your back with your knees bent, placing your hands behind the back of your head, with the foam roller just below your shoulder blades.
- Keep your hips on the floor with your feet hip width apart.
- Position your back parallel to the floor, then begin to move side to side in a sideways motion.
- Spend 30 seconds to 2 minutes, depending on your level of discomfort.
Tips
- Use a foam roller that is firm enough to provide pressure but not too hard to cause discomfort.
- Breathe deeply and slowly to help relax your muscles.
4. Lats Foam Roll
Foam rolling the lats applies pressure to the lats muscles, which are located on the sides of the upper back.
The exercise is beneficial as it targets a challenging area to stretch. The roller acts like a deep tissue massage by kneading and pressing the lats, releasing small knots and tight spots.
I’ll be honest: the first time I tried this, it felt a little awkward and uneasy. But once I got the hang of it, it quickly became one of my favourite rolls.
Benefits Of Foam Rolling Lats
- It benefits weightlifters and athletes, as it can help relieve sore muscles and prevent injury.
- Reduces muscle tension and soreness in the lats
- Improves flexibility and range of motion in the shoulders and upper back

How To Do
- Lay on your side and extend the bottom leg. Bend your top knee and keep your foot firmly pressed to the floor.
- Place the roller under the armpit and extend the bottom arm.
- Length the arm with the palm facing upwards.
- Then, use your legs to slowly shift your body 10–15 cm upwards and downwards.
- Repeat on the other side
Tips
- Be careful not to roll too close to the shoulder joint, as this can cause discomfort or injury.
- Use your free hand to support your body weight and control the pressure applied by the foam roller.
- Pause for 5–6 seconds on tender spots and take slow, deep breaths to relax.
5. Roller Lats Hold And Stretch
Foam roller Lat hold and stretch focuses on stretching and releasing tension in the latissimus dorsi muscles, commonly known as the lats.
It helps to enhance the range of motion and reduce pain after intense exercise.
Benefits Of Roller Lats Hold And Stretch
- Increase the flexibility of the lats muscles, making it easier to do daily activities and exercises.
- Improve posture and reduce the risk of shoulder and back pain after a workout.

How To Do
- Lay on your side with the legs in a bent position that feels comfortable.
- Place the foam roller perpendicular to your body, under the middle to the upper part of your side back.
- The length of the arm with the palm facing upwards.
- Slowly pull the arm down towards your chest, bending at the elbow. Lengthen the arm and repeat.
Tips
- Use a foam roller that is firm enough to provide adequate pressure but not so hard that it causes pain.
- Breathe deeply and relax your muscles during the stretch.
- Don’t roll over your rib cage or spine, which can cause injury.
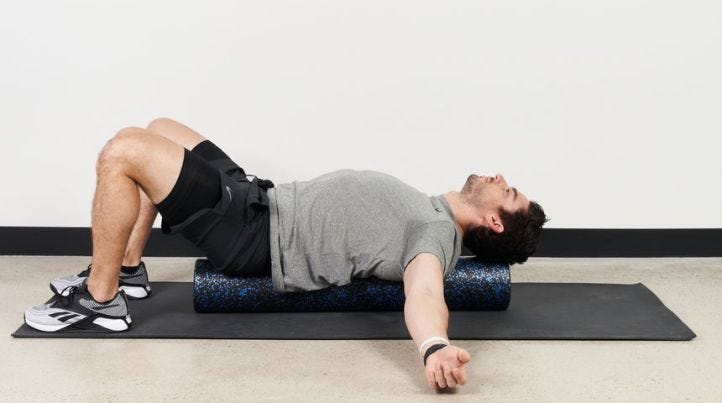
6. Chest Opener Foam Roll
The chest opener foam roll is an exercise that uses a foam roller to stretch and open up the chest muscles, which can become tight and restrictive due to poor posture or too much sitting.
Chest openers improve posture and reduce back pain by preventing rounded shoulders and hunching that comes with long hours of sitting or computer work.
Benefits Of Chest Opener Foam Roll
- It helps to reduce shoulder pain and tightness by opening up the chest muscles and reducing shoulder tension.
- Increases shoulder mobility and flexibility by stretching the anterior deltoids, pec major, and pec minor muscles.
How To Do
- Place the foam roller horizontally on the ground and sit in front of it with your knees bent and feet flat on the ground.
- Lie back on the foam roller so that it is positioned across your upper back and shoulder blades.
- Spread your arms wide and out to the sides, with your palms facing upward.
- Take deep breaths and relax into the stretch, holding for 30–60 seconds before rolling off the foam roller.
Tips
- Be sure to keep your head and neck supported throughout the stretch.
- If the stretch is too intense, try using a smaller foam roller.
- Focus on breathing deeply and relaxing into the stretch.
7. Glute Foam Roll
Glute foam rolling is a form of self-myofascial release that targets the gluteal muscles located in the buttocks.
According to the study, glute foam rolling can promote muscle relaxation, enhance hip range of motion and flexibility, and improve posture.
Benefits Of Foam Rolling Glute
- Enhance range of motion and flexibility, improving overall athletic performance.
- Improve muscle activation in the gluteals, which are important for daily activities like stair climbing and sports movements like running.
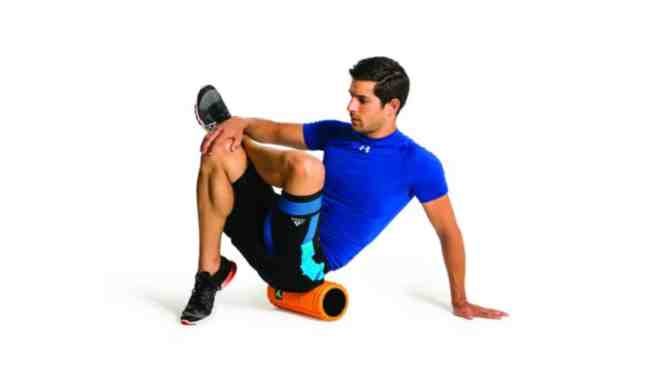
How To Do
- Sit on top of the foam roller and cross one ankle over the opposite knee. Use your hand to steady yourself.
- Relax your leg and tilt toward the bent leg. Slowly roll from the top to the bottom of the glute muscle.
- When you find a sore spot, stop and hold the position for at least 30 seconds until you can feel the muscle relax.
- Or roll back and forth over the glute for 30–60 seconds.
- Switch sides and repeat the process.
8. Bridge On Foam Roller
Bridge on Roller involves performing a bridge while lying on a foam roller. It is designed to challenge the core, glutes, and hamstrings while also improving balance and stability.
Benefits Of Doing Bridge On Foam Roller
- Strengthens the glutes, hamstrings, and core muscles
- Improves balance and stability
- Increases flexibility in the hip flexors and lower back
- Relieves tension in the lower back

How To Do
- Lie on your back with your knees bent and both feet resting on the foam roller.
- Place your arms parallel to your body for support.
- Carefully lift your spine off the mat, pushing your hips up towards the ceiling until you’re in a bridge position.
- Your body should be straight from your knees to your head.
- Hold the position for a few seconds, engaging your core, glutes, and hamstrings.
- Slowly lower your spine back down to the mat and repeat.
Tips
- Keep your core engaged throughout the exercise
- Focus on squeezing your glutes and hamstrings as you lift your hips
- Use slow, controlled movements
- If you feel any pain or discomfort, stop the exercise immediately
9. Plank on Foam Roller
Plank on Roller is a variation of the traditional plank exercise involving performing a plank while resting on a foam roller.
This exercise targets the core muscles, enhances balance and stability, and boosts overall body strength.
Benefits Of Doing Plank On Foam Roller
- Strengthens the core, including the abdominal and back muscles
- Improves balance and stability
- Increases hamstring and lower back flexibility.
- It can help reduce the risk of back pain and injury.

How To Do
- Place a foam roller on the floor and get into a plank position with your forearms resting on the roller and your feet on the floor.
- Ensure your elbows are directly under your shoulders and your body is straight from your head to your heels.
- Hold this position for 30 seconds to 1 minute, or as long as you can maintain proper form.
- To increase the difficulty, try lifting one foot off the ground and holding it for a few seconds, then switching to the other foot.
Tips
- Keep your core muscles engaged.
- Keep your back straight and avoid arching or rounding
- Breathe deeply and evenly throughout the exercise
- Start with shorter hold times and work your way up as you get stronger
10. Lower Back Roll
The lower back roll is a great exercise for relieving tension and pain in the lower back.
It helps to relieve tension and tightness in the lower back muscles, which can be caused by prolonged sitting or standing, poor posture, or exercise.

How To Do
- lie on your back and horizontally place the foam roller below your lower back.
- Bend your knees and press your feet into the ground.
- Draw your knees towards your chest and place your hands on your thighs or shins.
- Gently shift your weight to the right, lifting the left side of your low back off the foam roller.
- Hold for a few seconds before shifting to the left.
- Repeat this side-to-side movement for up to 1 minute, repeating 2 to 3 times.
Tips
- Do slow and controlled movements.
- Avoid rolling over bony areas or joints.
Tips For Foam Rolling the Back
- It’s important not to roll over an area for too long, or you might experience bruising.
- Try to identify your trigger point and maintain constant pressure over the area for at least 10–30 seconds while slowly breathing. Any discomfort or tenderness will gradually ease.
- It’s always best to start light with a manageable amount of pressure and then slowly increase it as your body relaxes.
- Slowly and specifically roll each targeted muscle for 1–2 minutes and rest between sets.
- Try to relax while foam rolling. This will reduce the possibility of cramps and injury.
- Rolling out can do more harm than good when it is done over the wrong areas, such as your lower back, and directly over a joint or bone.
- Avoid rolling your lower back, as it can cause the spine to contract to protect itself. Consider using a tennis or lacrosse ball to alleviate lower back pain instead.
- If an area is too painful to apply direct pressure, shift the roller and apply pressure to the surrounding area to gradually loosen the entire area.
FAQs
How does foam rolling help the back?
Foam rolling can help release tension and knots in the muscles of the back, which can relieve pain, improve posture, and increase mobility.
How often should I foam the roll my back?
It is generally recommended that you foam roll your back for 10–15 minutes a day, 3–4 times a week.
Which foam roller for the back is the best?
Long rollers are a good choice for your first foam roller. They are good for your back because they are long enough to cover your full back when they are positioned perpendicular to your spine.
Can foam rolling cause any harm?
Foam rolling can be uncomfortable, but it should not be painful. It is important to listen to your body and stop if you experience any sharp or intense pain.
It is also important to avoid foam rolling over areas of the spine or directly on areas of inflammation or injury.
Reference
- Clark, M. & Lucett, S. (2011). NASM Essentials of Corrective Exercise Training. Baltimore, Maryland. Lippincott Williams & Wilkins Publishing.
- McCall P. (2017). 6 benefits of using foam rollers.
acefitness.org/education-and-resources/professional/expert-articles/6575/6-benefits-of-using-foam-rollers - McCall P. (2017). 6 benefits of using foam rollers.
acefitness.org/education-and-resources/professional/expert-articles/6575/6-benefits-of-using-foam-rollers - Pearcey GEP. (2015). Foam rolling for delayed-onset muscle soreness and recovery of dynamic performance measures.
ncbi.nlm.nih.gov/pmc/articles/PMC4299735/ - Cohen, S., Argoff, C. & Carragee, E. (2008). Critical Review: Management of low back pain. BMJ 337(a2718).
- Healey, K., Hatfield, D., Blanpied, P., Dorfman, L. & Riebe, D. (2013). The effects of myofascial release with foam rolling on performance. Journal of Strength and Conditioning Research. 28(1):61–68.
